比較バージョン

キー

  • この行は追加されました。
  • この行は削除されました。
  • 書式設定が変更されました。
Sv translation
languageja

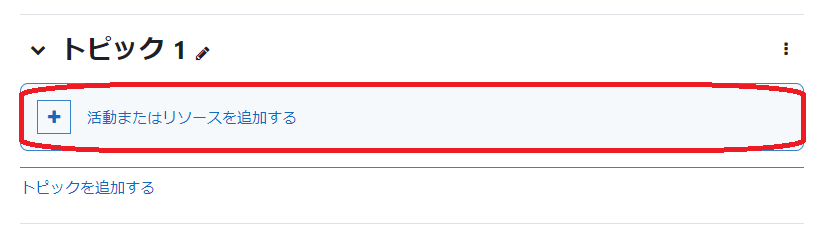
資料を掲載したいトピックにある「活動またはリソースを追加する」をクリックします。

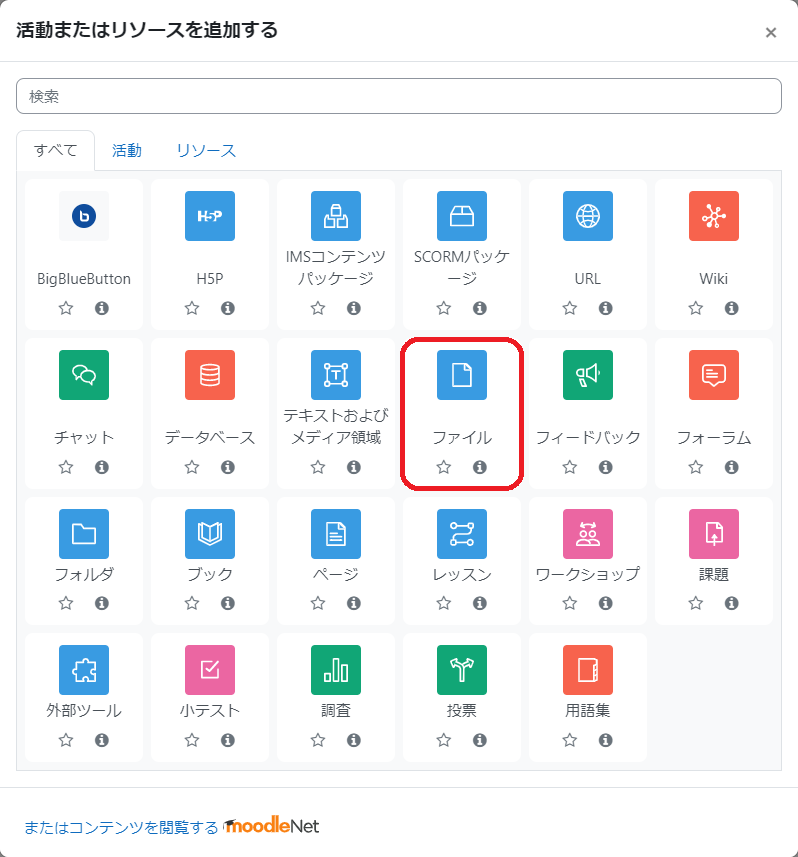
追加するコンテンツのメニューが表示されますので、「ファイル」を選択して「追加」ボタンをクリックしてください。

以下の手順でファイルを登録します。

  1. 「名称」欄にコース上に表示するファイルの名称を入力します。

  2. 「説明」欄にファイルの説明を入力します。コースページ上のリンクの下にも説明を表示させる場合は「コースページに説明を表示する」にチェックを入れます。

  3. アップロードするファイルを点線の枠内にドラッグ & ドロップします。

以上の設定が終わったら、画面下部の「保存してコースに戻る」か「保存して表示する」をクリックしてください。

注意

アップロードできるファイルサイズの上限は 2MB です。上限を上げるには、コース上部「設定」をクリックし、「ファイルおよびアップロード」の、最大アップロードサイズの項目にてサイズを変更し、「保存して表示する」をクリックしてください(最大 300MB まで増やすことができます)。

ファイルサイズが大きい場合には、情報科学センターの「Nextcloud」というファイル共有サービスを使って URL だけ通知する方法もあります。ただし URL の有効期限は最大 2 週間までですので、ご注意ください。


Sv translation
languageen

Click  'Add an Activity or Resource' within the desired topic to publish the material.

A menu displaying content options will appear; click 'File' icon.

Follow the steps below to register a file:

  1. Enter the desired name for the file in the 'Name' field.

  2. Provide a description for the file in the 'Description' field. To display the description below the links on the course page, check the 'Show description on course page' option.

  3. Drag and drop the file you wish to upload into the designated area.

After completing the steps above, click either 'Save and return to course' or 'Save and display' at the bottom of the page.

注意

The maximum file size for uploads is 2MB. To adjust this limit, navigate to 'Settings' at the top of your course, modify the size in the 'Maximum Upload Size' section under 'Files and Uploads,' and then click 'Save and Display' (you can increase it to a maximum of 300MB).

If the file size is large, consider using the file sharing service 'Nextcloud' provided by CIS to share only the URL. Please note, however, that URLs have a maximum expiration period of two weeks.